Roll, Loop, Curl- New Hampshire Quillers Share Crafting Secrets
Uncoiling the age-old art form of quilling

For the piece “Birches At Sunset,” Sandra White chose vibrant colors to make the nature scene. White compressed and layered coils to make the sunset, the water reflection and the white birch trees. Courtesy/ Sandra White
Whether you use hand-cut strips of colored construction paper and a straw, or buy archival drawing papers and specific tools, quilling is accessible to nearly everyone.
Quilling’s history stretches back to 105 A.D. in the Western World, when paper was invented. The art form gets its name from how narrow strips of gilt-edged paper would be wrapped around goose quills to get a “coil” shape. In the 14th and 15th centuries, religious orders used quills for paper decorations.
The craft, also known as paper filigree, gained prominence once paper mills began churning in England around 1495. Women in higher society were among the first to take up quilling.
Interest in quilling was reignited in the 18th and 19th centuries, when it was taught in boarding schools. By then, it was considered a pastime for “ladies of leisure” who sought to add culture to their lifestyle or make themselves more desirable to men.
Marianne Fassett of Enfield, a member of the North American Quilling Guild and the League of NH Craftsmen, explains that quilling is “the art of curling and bending paper to make designs.”
Fassett, a juried member of the organization since 2016, says these women of leisure made all types of quilling projects.
“They decorated tea caddies, cribbage boards, urns, baskets, trays and furniture. Because of the delicacy of their works, only a few of their items still exist and are preserved in Northeastern American museums,” Fassett says.
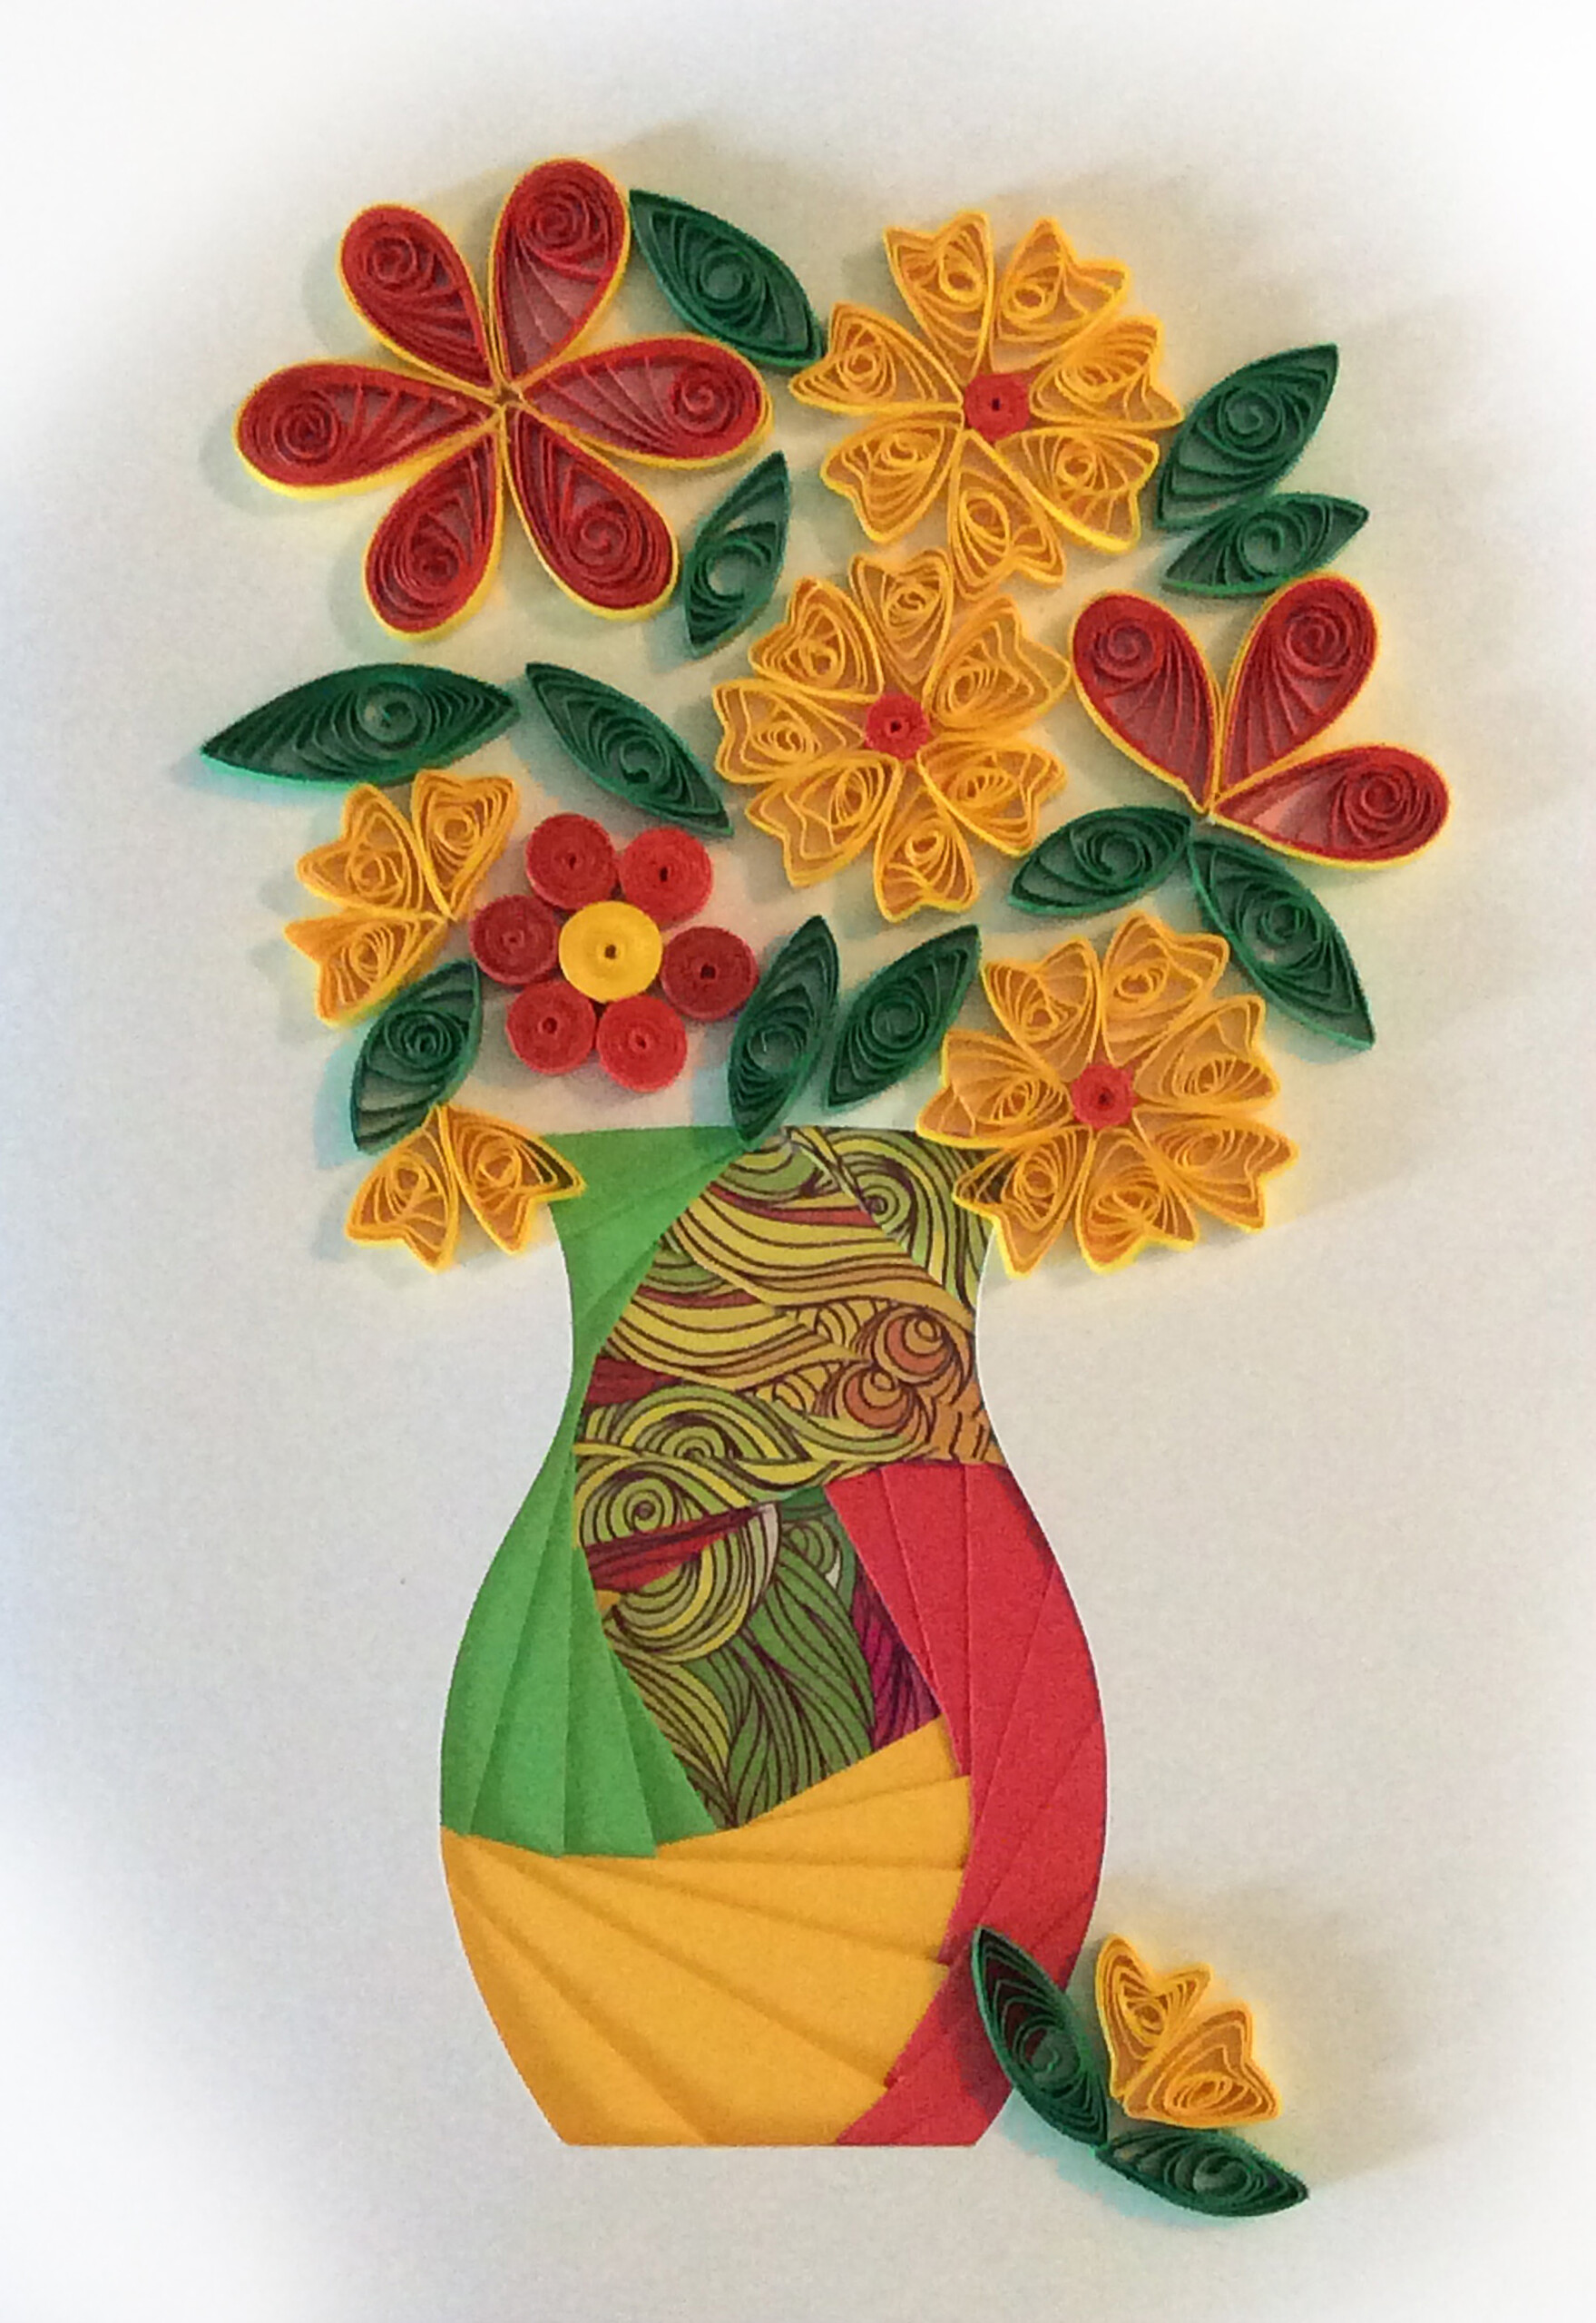
Marianne Fassett uses an “iris-folded” technique to create the multicolored vase. For the flowers, she uses a variety of shapes, from tight coils to coils that unravel slightly and are pinched at the end. Courtesy/ Marianne Fassett
Fassett enjoys using quilling to decorate the edges of wedding invitations that can be gifted to the bride and groom, but she creates a wide variety of projects.
“My imagination can run away with me. I do 3-D Christmas ornaments as well as flat ornaments and refrigerator magnets. I have decorated tops of wooden boxes, and made small boxes by stacking coils,” Fassett says.
She also knits clothing for 6-inch baby dolls.
“My parents instilled crafting of all kinds in my sister and me,” she says.
Sandra White, a member of the League of NH Craftsmen since 1986, says its gentle learning curve makes quilling an easy craft to pick up, though it involves some trial and error at the start.
White remembers the first time she tried to have her artwork accepted at the League’s annual fair in Sunapee.
Initially, for loon feathers, she used quill-ing coils to make circles. But the piece wasn’t accepted. White says a judge asked her, “Why doesn’t that look like a feather?”
“And I was like, ‘Oh, little light bulb. You’re right.’ So I went back and played with that some more,” she says.
White’s favorite pieces include local nature and wildlife scenes. In one, a multicolored rooster is just getting ready to sound off as he sits playfully on a sunflower. In another, a slender great blue heron with a yellow beak stretches up to the sky as it stands tall and straight among the reeds.
White, who lives close to the Merrymeeting River in Alton, often likes to watch these graceful blue herons hunt for food there.
She also loves creating imaginative landscapes, because it’s a chance to use more varied colors. One scene features a dragonfly enclosed in a circular space filled with bright flowers. For another, the sun sets behind a
row of green hills as tall white birches stand in the foreground.
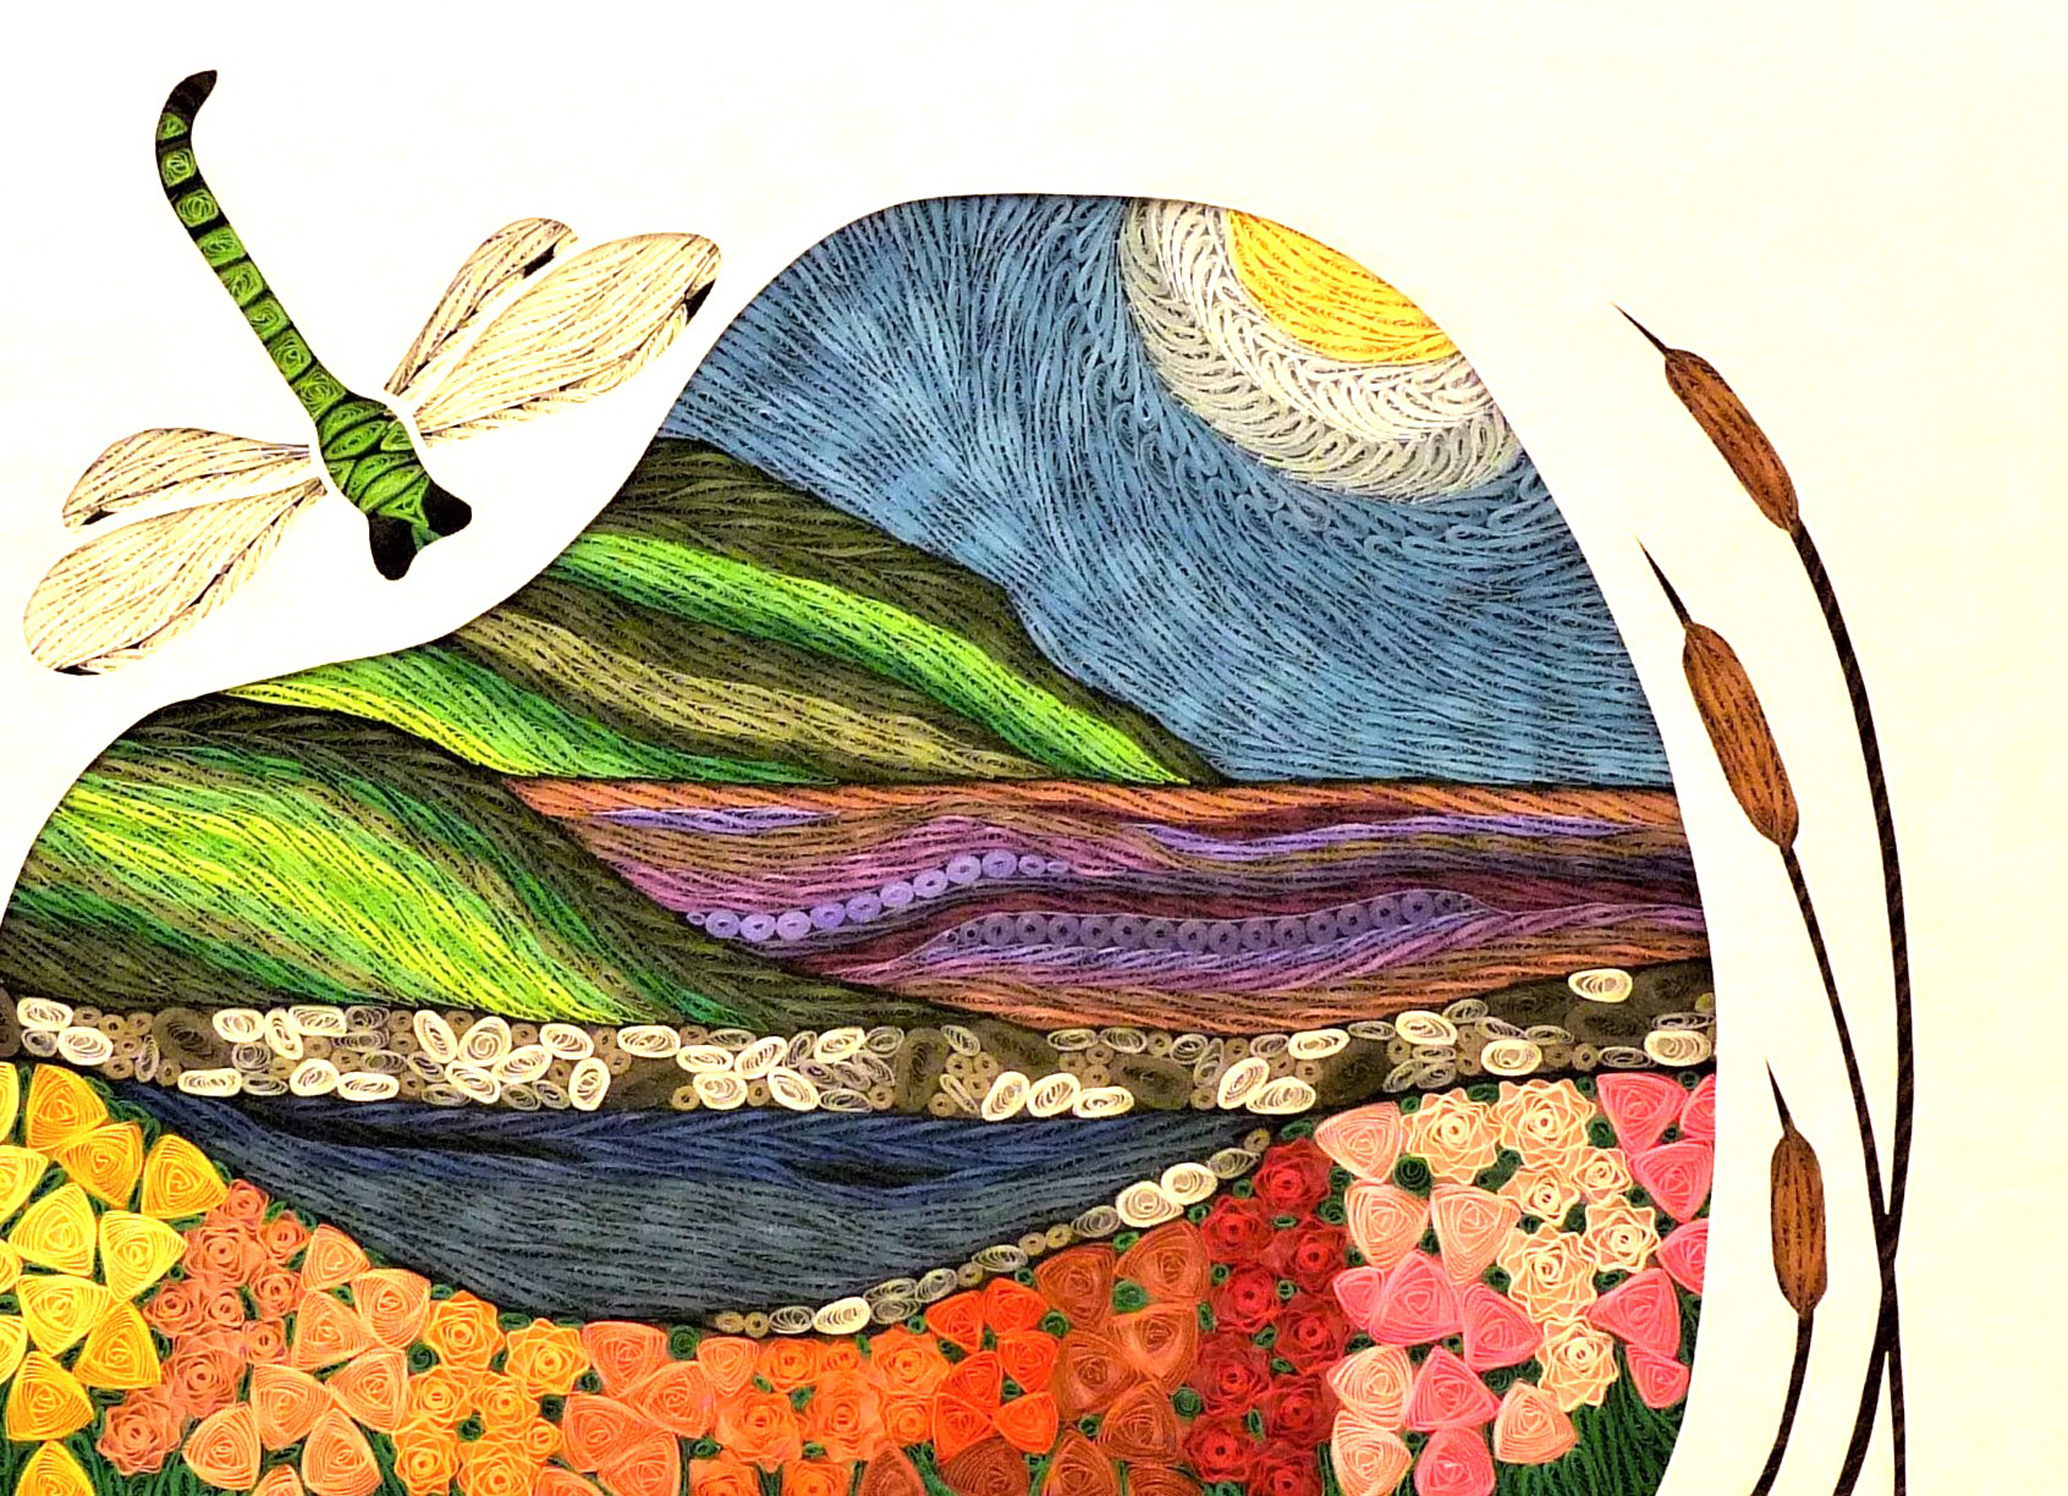
In “The Dragonfly’s Life,” White layers a variety of quilling shapes to represent the dragonfly’s body, and uses triangular and star-shapes to make the multicolored flowers at the bottom. Tighter coils represent some parts of the water. Courtesy/ Sandra White
For each piece, White says the image she envisions will usually change once it hits the paper.
“I think you accumulate things in your mind, and you come out with a piece,” White says.
In fact, White prefers that the final piece look different from what she first envisioned.
“I think it’s usually better, because you get to tweak it,” she says.
White has her own method for shaping coils.
For a triangle, White uses a needle-slotted tool to roll a circle, then lets it unroll a bit so the coil loosens a little. Then she’ll “pinch it” to get the shape she wants.
“Everything starts as a circle. So if you can envision a circle, and then envision it uncoiling like a spring, so you’re looking at a round coil … then you shape it,” White says.
To quill flowers, she’ll “crinkle” or “crimp” the paper.
“Fold it into a zigzag, and then roll it. If you let go too much, it’ll just unravel. Let it unroll a little bit,” advises White, who is self-taught and doesn’t have any formal art background.
Fassett, meanwhile, says her most cherished piece, a vase overflowing with colorful wildflowers and a soaring butterfly, is very personal to her.
“My favorite piece is the vase of wildflowers made in memory of my mother. I created it for my accreditation piece with the North American Quilling Guild,” she says.
Fassett also enjoys teaching the craft, and has gotten others hooked on quilling in a unique way — she’s a member of the Dancing Quillers of VT/NH, a group of quillers who get together to square dance and quill, not necessarily in that order.
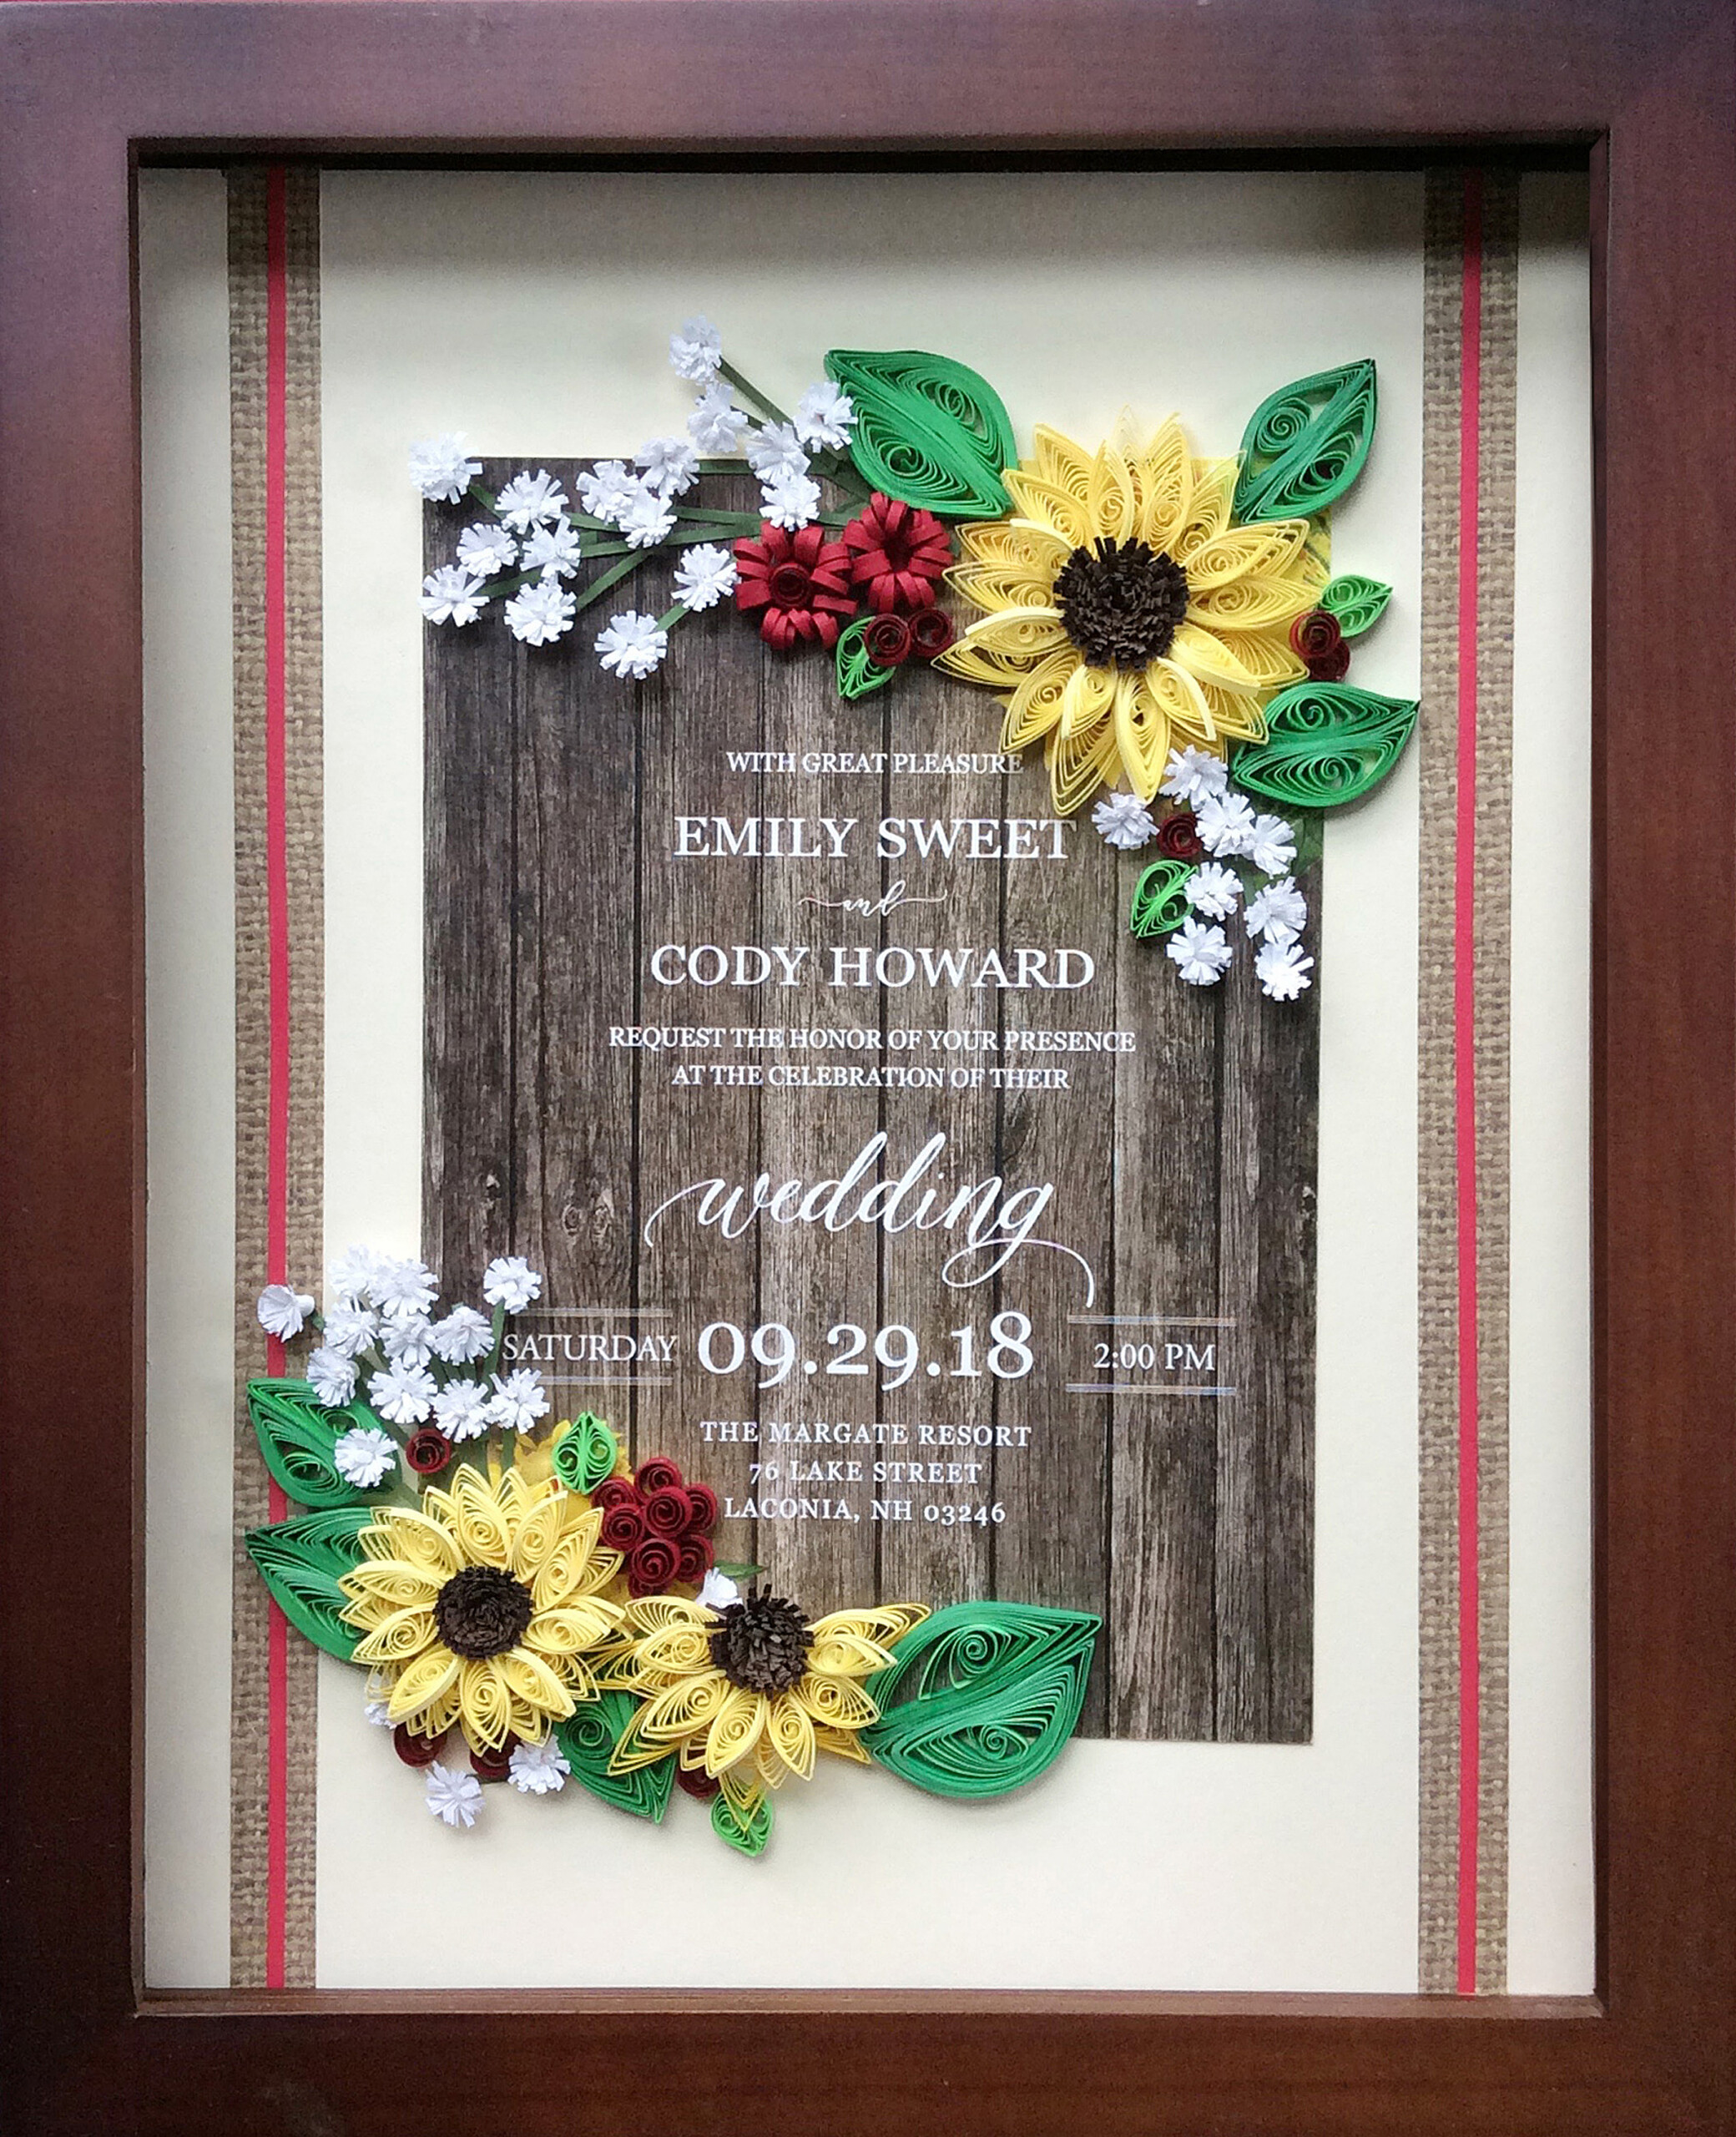
Fassett embellished this wedding invitation at the corners with quilled yellow sunflowers, smaller light-colored and dark red flowers, and bright green leaves. Courtesy/ Marianne Fassett
Steve Caswell of Waterbury Center, Vermont, who has been quilling since 2010, learned about the art form through one of Fassett’s Dancing Quillers events.
Caswell is most proud of an Easter egg he quilled and brought to a national quilling convention in Lancaster, Pennsylvania. He won third prize and says he was the first man to win a quilling competition, adding that there aren’t many men who take part in the craft. Caswell, who has a crafting background in 4-H (his mother knitted a lot), is also a watercolor painter.
Besides Christmas ornaments, Caswell makes paper weights, jewelry and trinket boxes.
“It’s pretty endless as to what you could create. And there are multitudes of books out that have quilling patterns that you can follow,” Caswell says.
Caswell, who has written articles for the North American Quilling Guild and Quill America, explained quilling as “making coils with strips of paper and shaping them into different shapes to fit your design.” He and his wife, Joanna, are eager to attend national quilling and square-dancing conventions, conduct demos to show off seasonal projects, and explain the craft to anyone else who’s curious about it.
He’s also seen younger people developing an interest in quilling.
“Younger generations are getting into it,” Caswell says. “The young kids really picked it up very quickly, and they thought it was a lot of fun.”
Quilling 101
Quilling can be used to create almost any design imaginable and for a wide variety of projects, like embellishing a greeting card, making 3D models of animals, or making festive and vibrant jewelry.
Any strip of paper will work in quilling — lined paper, note paper, construction paper — and any cylindrical round item can create coils: toothpicks, pens, pencils, markers and more. Professional quillers, however, might use higher-quality strips of paper and needle-slotted tools to roll the strips.
To start, take any size strip of paper and roll it around a pen, pencil, straw, etc. to make a coil, then glue the ends of the strip together so it doesn’t unravel. Then the coil can be manipulated and stretched to create different shapes. Be careful not to use too much glue, artist Sandra White says.
Tight coils create round shapes, but if you let it “uncoil” a bit without unraveling it, you can “pinch” one or both ends to get more shapes.
For example, stretch out a coil to lengthen it to make a flower petal. Keep the coil tight to create an eye, or stretch out it farther to make gentle ocean waves or curls. Stack and arrange coils together to create the body of a stout bee, a slender tree or the setting sun.
Once you have the shape you want, lightly glue the edges of one side of the coil to the work surface to build your design.